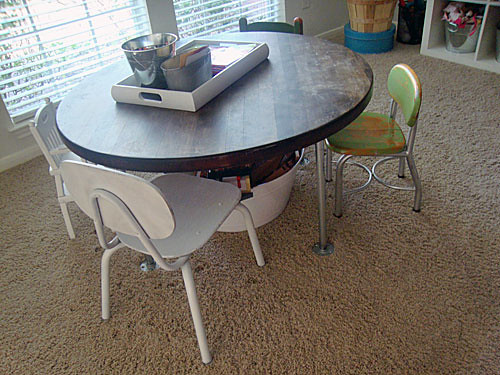
Mar 22, 2011

The Mini-Mudroom

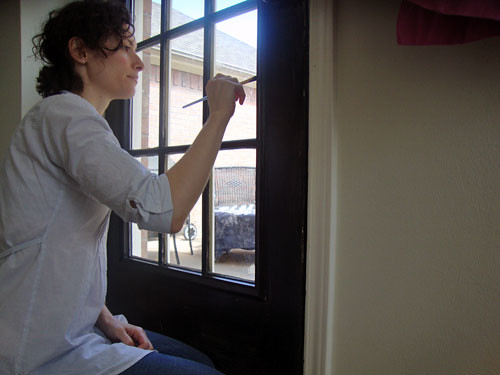
The kids and I were painting all morning yesterday... they were painting with watercolors for an art display we're creating in the playroom (more on that tomorrow!) while I was painting our back door that opens into the kitchen.


I decided to paint the back door the color black to enhance our mini-mudroom, I mean our mini-mini-mudroom (by the way, that shirt makes me look kinda pregnant, so before anyone asks... no, I'm not prego).  I'm making a mudroom out of nothing because I desperately NEED a place to dump my stuff (kid stuff) when we walk in the back door.  The back door is really our main entrance... we use it to get to the garage, the driveway and the backyard.

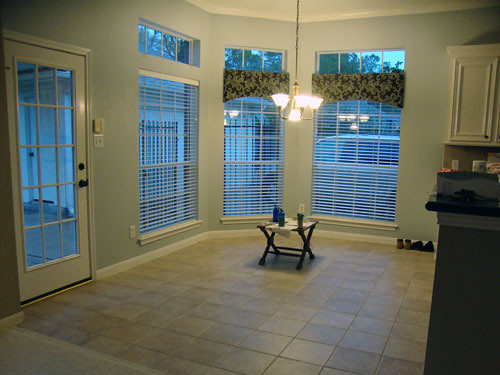
Here's a before full-view of the back door leading into the kitchen area...

And, here's the freshly painted black door (with the Craigslist table and chair project that is waiting for me)... so much contrast, I LOVE it!
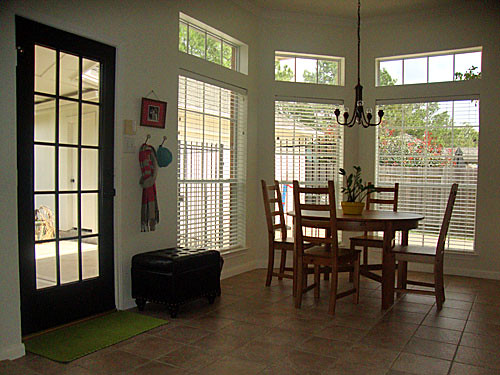

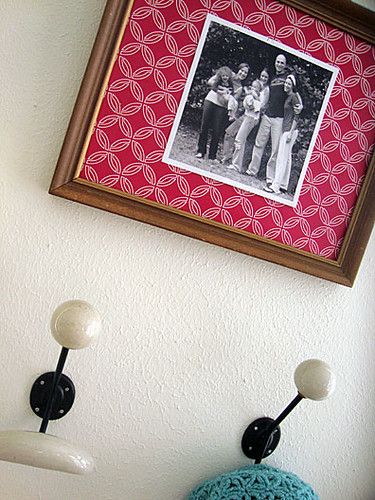
Now, don't laugh.... see that teeny-tiny wall space to the right of the black door?  That's what I'm calling our mudroom.  I added a frame for good memories, two hooks for coats, hats, purses, etc, and a much needed storage bench for shoes (remember, we live in TX so hopefully I won't need all the winter gear -- hugs to all my Northern readers, I don't know how you do it!).


I'm planning on giving the storage bench a little makeover.  I think the fake leather looks... well, too fake.  I'm thinking of adding extra padding over the tufted top and covering it with a black/cream ticking striped fabric that I have in my fabric stash... looks like this...

Black and White Ticking Fabric

I'll keep you posted on the mini-mini-mudroom progress.... it should be a speedy makeover since it's such a small space in the kitchen.

Psst, the rest of the kitchen progress is here.

Mar 21, 2011

A Kitchen & A Few Gallons of Paint

Toward the end of last week I posted before and after photos of a few, little adjustments I made in our kitchen to freshen the look.   Today, I thought I show pictures of our previous kitchen back in VA, since I used a few ideas from that kitchen to update our new kitchen.

You might remember the post on my "Mom Space" a while ago... that was actually part of the kitchen too.  Now, here's the other side of the kitchen where I actually cooked, baked and did all the fun stuff!

Here's the before...


 And, the after...


Here's the before of the other side...


And the after...


Sooo different, eh?  Paint is amazing.  The ceiling was painted Gentle Tide by Glidden and color matched into a Benjamin Moore paint, the walls and cabinets were painted White Dove, the trim was painted Simply White, and the door was painted Black Beauty, all by Benjamin Moore.

On the back and side of the peninsula, I used a black chalkboard paint to give the kids space to be creative (the chalk usually kept them occupied while I was getting dinner ready).  I also added a desk painted in black chalkboard (sorry for the horrible picture) and a chair painted green that fit under the desk.  The desk held the kid's calendar, jars with crayons, markers and glue, and a bin for scrap paper... they really loved having their own space in the kitchen (so did I).

We didn't have a huge budget to overhaul the kitchen, but with a few coats of paint we were happy with the results... I love paint, it can bring a whole new look to the same room (without spending a fortune)!

Linking up to 'Paint: It's Not Just For Walls' at The Inspired Room.

Mar 18, 2011

Lamb Burgers

The weather is warming up around here and that means it's grillin' time for us!  When the kids hear grill, the first thing they request are burgers.  I like to mix it up a little and try different spices and toppings, and sometimes a different type of meat.... this time we used lamb.


I altered a recipe printed in Cottage Living via Sara Foster a few years back... it was called 'Grilled Lamb Burgers with Cucumber Yogurt Sauce'.  Here's what I used for our lamb burgers (to feed two adults and three kids (who eat like hungry adults)).

Ingredients for Lamb Burgers:
  • 4 garlic cloves, minced
  • 4 tbsp of fresh oregano, chopped
  • 4 tbsp of fresh mint, chopped
  • 2 tsp of sea salt
  • 1 tsp of ground pepper
  • 1/2 cup of cucumber sauce (see below)
  • 2 lbs of ground lamb
  • 8 burger buns, toasted (we used sprouted whole grain bread, like this)

Directions:  Combine the garlic, oregano, mint, salt and pepper in a large bowl.  Add the cucumber sauce and mix well.  Then add the lamb and combine (don't mix it too much or the meat will be crumbly and fall apart).  Form eight patties.  Grill the lamb burgers over medium-high heat, turning only once (about three minutes of each side).  Remove the burgers from the grill, cover loosely and let them rest for about five minutes. 

Ingredients for the Cucumber Sauce:
  • 1/2 of a small red onion, diced
  • 1 cucumber, grated and diced
  • 2 garlic cloves, minced
  • juice from 2 lemons
  • 2 tbsp fresh mint, chopped
  • 2 tbsp fresh parsley, chopped
  • 1 tsp sea salt
  • 1 tsp ground pepper
  • 2 cups of mayonnaise  


Directions:  Combine all the ingredients for the sauce, except the mayo, and stir to blend.  Then add the mayo and mix well.  Refrigerate until ready to use.

After the burgers have rested for about five minutes, open and line the toasted bread with about two tbsp of cucumber sauce, a lettuce leaf (we used kale), an onion slice, a slice of tomato, and pickle or cucumber slices.  Then place the burger on the bread.


Enjoy your weekend!!!

Linking up to Beauty and Bedlam.

Mar 17, 2011

Open Shelving = Space for Pretty Things

A few weeks ago I removed french doors that were taking up space in the entry way of our almost-finished playroom.  After the doors were off I walked around the house, with drill in hand, to see if any other doors (or cabinets) should be removed.  I stopped in the kitchen.... and... removed a few cabinet doors...


Before I show you details of what the drill made me do, here's a photo of the kitchen right after we purchased the house (the kitchen was in great condition and one of the reasons we bought the house, just ignore our junk that's spread everywhere)....


I removed the cabinet doors to the left of the sink and above the refrigerator, then painted the insides a green-ish/blue color -- Wythe Blue by Benjamin Moore.


After the interior was painted above the refrigerator, I stepped back to take a look.  I thought it needed a little adjustment.... so, enter the hacksaw!  I cut out the middle wooden divider...


Then I patched, sanded and painted the edges, then added some prettiness on the shelves.... now this is a little more my style!


And, here's a view of the before and after pictures together (after picture is still a work in progress)... 


If you're curious about other changes that were made in this kitchen, the walls were painted Floral White by Benjamin Moore and the valances above the windows were removed.

Next on the list... window treatments and a light fixture...

Mar 16, 2011

Free Printables: Cowboy Birthday Party Invite

I have an adorable, blond-curly-headed, almost four-year old boy.... and we will celebrate his birthday this month!!!  Since moving to TX, his imagination and creative games involve everything cowboy -- the horses, the boots, the hat, the fake guns, everything.  So, when I asked what kind of cake he wanted, his immediate reply was "COWBOY" and then he went on to tell me the flavor of the cake, icing, and of course the colors of the sprinkles.  Cowboy cake it will be!

We typically do small and quiet birthdays with the family, but I realize many of my readers may not... so, I created this design for those who like to send out invites:


This cowboy invite is available for you, for FREE!  I designed it with my son's cowboy birthday in mind, so go ahead.... download, print, send out invites, or just pass along the link... enjoy!!!!

Cowboy Invite

Click the link above to download the pdf file, then print (the file has four of the same designs on a page).  Print on 8.5/11 paper (preferably white/cream colored card-stock), then cut down the middle both horizontally and vertically.  Birthday invites are now ready to be addressed!  Yee-haw!

Mar 15, 2011

Creating a Kid-Friendly Table: The Tutorial

Don't let the title throw you off... this post is about creating a kid's activity table, but keep an open mind while you're reading... the idea could also be used to create a coffee table, end table, night stand, stool, bench, the options are endless.  Ok, here we go...

Yesterday, I showed the new legs added to the kid's activity table in the playroom... our table was originally too high and needed to be adjusted to make it more kid-friendly.  A few plumbing supplies (yes, plumbing supplies) did the trick and today I'm going to show you how I created this "new" table...


Here's what I started with.... a standard wooden table, the base was attached in the middle with screws...


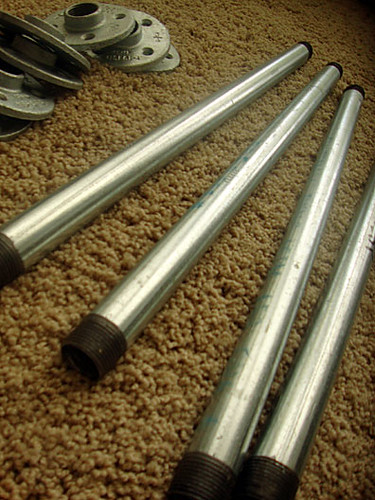
I purchased a ten foot galvanized plumbing pipe and had it cut into four pieces -- 20 inches each -- with some leftover and threaded on each end.  Most home improvement stores will cut the pipes for you and charge just a few cents for each cut and thread.  Most home improvement stores will also carry pre-cut threaded pipes, but I was set on 22 inches as my table height and needed a custom cut.  I also purchased eight galvanized flanges.


So, for this project I laid out the following materials:
  • 1 table top
  • 4 metal plumbing pipes cut to specification and threaded on each end
  • 8 metal flanges
  • 16 screws (type of screw depending on the material of the table top)
  • drill
  • pencil

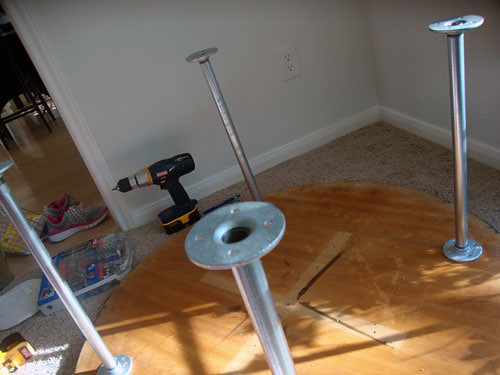
Remove the table top from the base and lay the table top on a flat surface with the underside up, as shown...


Place the four flanges on the table where the legs will be....


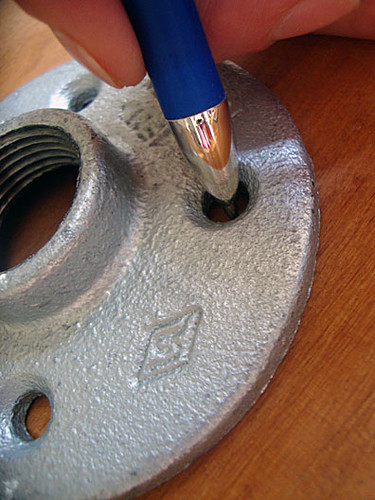
Mark the four screw holes on each flange with a pencil (I only had a pen at the moment)...


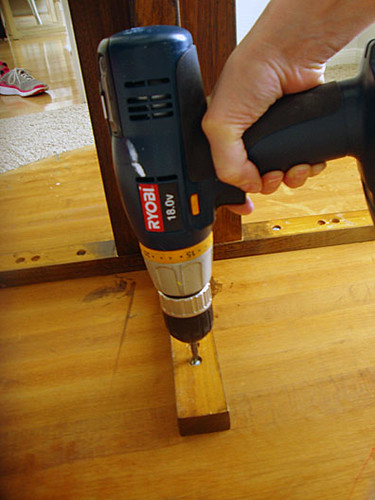
Remove the flanges, then drill the four holes for each flange (16 holes, total) using a drill bit a little smaller than the size of your screws....


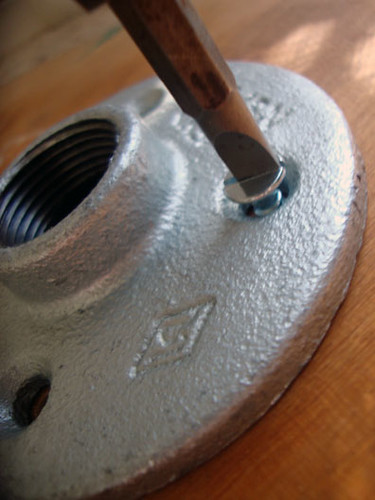
Once the holes are drilled, place a flange over each set of drill marks and begin to fasten the screws...


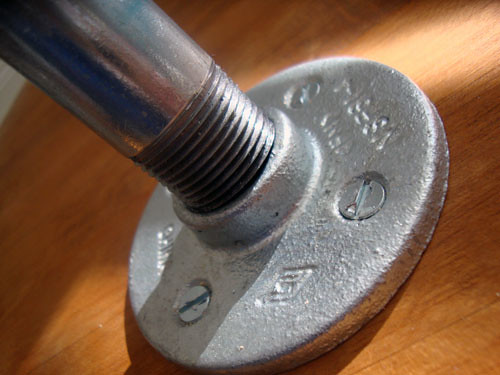
Then screw in one pipe to each flange....


Then attach another flange to what will be the bottom of each pipe....


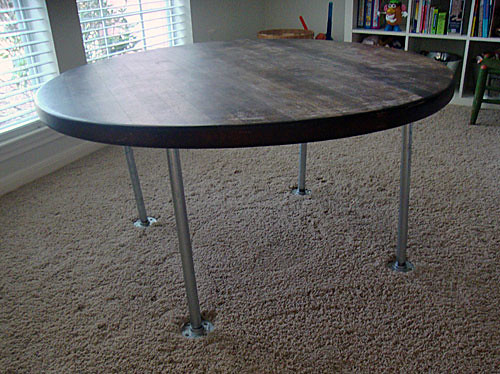
Turn your table over and it's a whole new look...


* Before you run out and purchase custom cut plumbing pipes, please take note:  The "legs" on my table are not perfectly straight.... this has to do with the way the pipes are threaded.  I was told at the home improvement store that they couldn't guarantee a straight cut, nor a straight thread.  I wanted to see how it would turn out anyway and since my table sits on a thick rug, I wasn't too concerned.  I think it looks fine (unless I get on my knees and analyze it for like ten minutes).  It's for the kids and they like it... so I like it.  As I said before, home improvement stores do have pre-cut pipes which may be threaded a little more towards perfect.

If you decide to take on this project, let me know.  I'd love to hear how it turns out!!!

Mar 14, 2011

Creating a Kid-Friendly Table

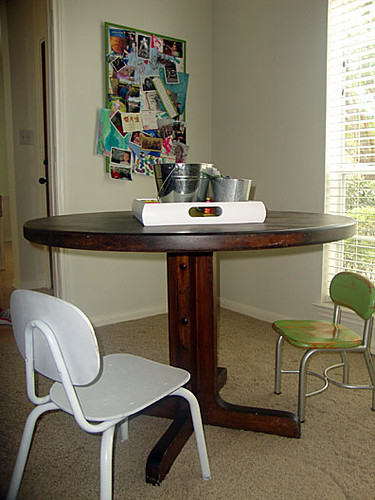
The table that we purchased off Craigslist last week gave us an opportunity to expand our thinking.  We were planning to keep our kitchen table just where it was... in the kitchen, but when the new table was brought in the house we quickly changed our minds (well, first the husband, I eventually agreed).  The new table is now in the kitchen and our jacobean stained table has been moved into the playroom....


I love the dark stain on the table against the creamy white walls, but that table is waaay too high for preschoolers... our kids are tall, but they are not giant, so this table needed an adjustment.  I wanted a really quick fix... I was wishing there were four legs on the table so I could just saw off a few inches on each leg to accommodate the chairs and the kid's height, but since the base is one solid piece in the middle of the table, the fix was going to require a little more time (thankfully not too much, though).

I made a quick trip to the local home improvement store and ended up in the plumbing section.  I came home with four galvanized pipes, each cut to 20" long and threaded on each end, and eight flanges...

After a few measurements and some drilling, here's the new look...


Beautiful, perfect.... and just the right size, 22" high (once the legs were screwed into the flanges and the table top screwed on).  The kids will be comfortable sitting or standing at the table coloring, building legos, setting-up train tracks, feeding babies, the list goes on... I love it, they love it!  We are one step closer to a finished playroom...


Tomorrow I'll give you the step-by-step on how to build your own kid-friendly table using a few things found in the plumbing aisle.

Mar 11, 2011

The Rodeo & Some Boots

The Houston Livestock Show & Rodeo is in full swing and will continue until just about the end of March.  We'll be headed to Reliant Stadium this month to see all the action and I thought it was only appropriate to order myself some boots (plus the husband promised me boots at Christmas)!

Look what arrived on my doorstep this week (I absolutely LOVE the way orders from Piperlime come packaged -- box, tissue paper, sticker, I love it all)...


Just what I ordered.... my first real pair of boots, with a little Southern style...


I'm a Northerner at heart so when I look down at my feet, I'm still in awe that I'm living in TX, saying y'all, and now wearing boots (that kinda resemble cowgirl).  Over the past twelve years I think I've been slowly turning into a Southerner (and loving every minute!).


Perfect boots for a rodeo...


By the way, don't you love that gilded mirror?  I brought it home this morning from Home Goods... it's going in the living room... and will be my first full length mirror since I've been married -- can you believe that?  I'll post pictures of the living room progress soon.

Have a great weekend... y'all!!!
Related Posts Plugin for WordPress, Blogger...