Aug 30, 2011

Dining Room Planning

As I'm finishing up a few other rooms in the house (living room, kitchen, and guest room- oh, and writing a post about the finished playroom), I'm also decorating the dining room in my head.  Does anyone else decorate in their head... tell me I'm not the only one!

So, on to the dining room.... I mentioned here that I should really recover the seat cushions on my dining chairs.  We used them at our kitchen table in the rental house for about three months and the seat fabric is not so pretty anymore.  I'll keep the camera far away, but you get the picture.... kids and pasta sauce, strawberries, blueberries..... mmmm, yeah.... they need an update!

I debated between covering the seats in a vinyl-type fabric so spills could easily be wiped away or making slipcovers that I could remove and throw in the wash if they need a cleaning.  I ordered several fabric samples, both vinyl and cotton, in solids and prints.  Once I saw Chloe Ruby by P/Kaufmann in person, I was sold!

Fabric
Chloe Ruby by P/Kaufmann, available thru Tonic Living

This botanical print is beautiful... pink, golden yellow and cream..... lovely!  I'll be making slipcovers for my dining room chairs soon and maybe when they're finished I'll celebrate by throwing a dinner party!  Probably just in time for Thanksgiving :)

And since we're talking about the dining room, here's what the room looked like when we bought the house....

Dining Room Before

And here's what it looks like now.... the only updates I've made to the room so far have been painting the walls (Floral White by Benjamin Moore), removing the glass from the chandelier (more work to be done on the chandelier), taking down the curtains and moving our furniture into the room.

Dining Room Before

So, I'll start with updating the chairs in the new fabric and slowly work my way around the room.... I think there's gonna be more pink and maybe a little stenciling on the walls!

Aug 22, 2011

Free Printables: Daily Schedule

Today marked the first day of school in our house.... for my three kids and me!  This morning we embarked on our journey of homeschooling.  Kindergarten, pre-K, preschool and teacher....

Kindergarten

PreK

Preschool

Signs

I saw these school picture ideas (so cute!) on Pinterest, my new favorite (you can follow me here), and plan to keep this as a tradition at the start of every school year.... I love the idea!  I even dressed up for the first day of school, but tomorrow you might find me in my jammies :)

The kids are ecstatic about school at home.  You could say I have mixed emotions..... excited, a little nervous and everything in between, but most of all I'm thrilled that I have the opportunity to be with my kids on a daily basis, teach them the values we hold strong as a family and create a curriculum that expands their thinking and caters to each of their likes and interests.  Such a great and amazing adventure!

To help me stay semi-organized, I have a schedule.  I'm one of those lists, schedule-type people.  I have to-do lists all over the house and I need my calendar, always!  I love crossing off things on the list that I've accomplished.... somehow, I get a real satisfaction.  Anyway, back to my schedule..... here's how I hope to stay a little more organized during our weeks of school, my daily schedule is clipped to the back of my pantry door....

Schedule

Schedule

I'm sure this schedule will change about 2,351 times throughout the year, but for week one I think it'll work.  It's our master plan to help me stay on track during the day/week.... when to do reading, writing, Math, etc, or when we need to be at a kid's activity (dance, Taekwondo, playgroups, field trips, etc).  I even have times set aside on the schedule to clean, do laundry, exercise, etc.  And most importantly, there's a rest time.  This mom LOVES rest time!

So, if you want a blank sheet to create your family's master schedule, I've made one available just for you, for FREE!  Go ahead.... download, print, or just pass along the link... enjoy!!!!

Daily Calendar/Schedule

Click the link above to download the pdf file and print on 8.5/11 paper (preferably white/cream colored card-stock), then hang where it's visible! 

One more thing.... if you want to know how we spiced up our clothespins, the tutorial is here. Then I took the clothespin apart, nailed one end to the door (it split the wood a little), slipped the spring and front part back on and then clipped our schedule to the door.  Fancy!

Schedule

Enjoy the new school year!

PS - I finished decorating the playroom just in time to start school.... I hope to post the details and of course tons of pictures by late next week!  Oh, and did you get a sneak peak above of new furniture in the living room?  More on that soon too :)

Aug 17, 2011

Girl's Bedroom Big Reveal

My girly-girl's room is decorated..... all in pink!  I'm a huge fan of pink and I must have passed on my love of this color to my girls because when I asked what color they wanted their room, their response was pink (almost in unison)!  Perfect!!!  So, we call this "Dreaming in Pink".....

Girls Bedroom

After deciding on the layout of the bedroom (seen here, here, here and here), the girls and I knew we wanted a lot of pink throughout the room.  We always seem to have lots of pink things around the house, so we only needed a few things (and plenty of work) to bring it all together.

Girls Bedroom

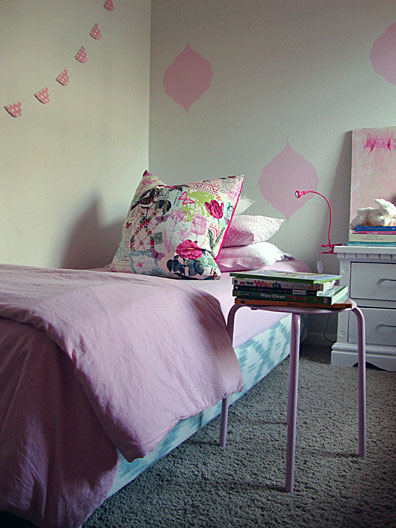
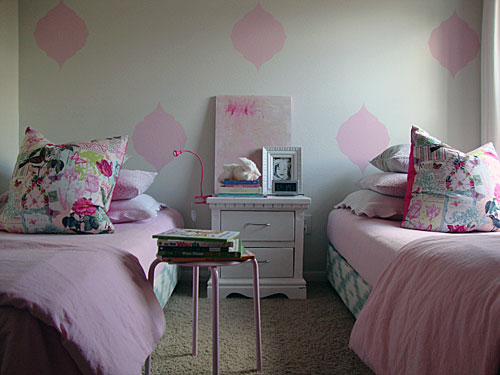
For the bedding, we used a few things we had on hand (Shabby Chic floral sheets, a cotton pink blanket, a white scalloped pillow), then added fabric with additional color.  After looking at 
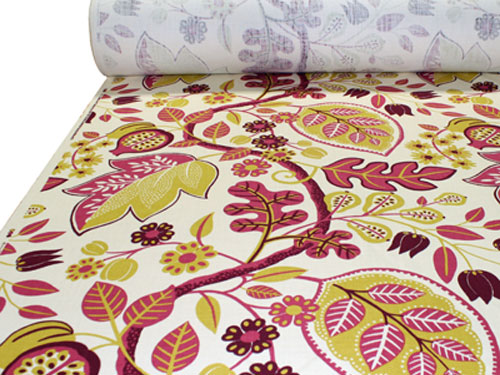
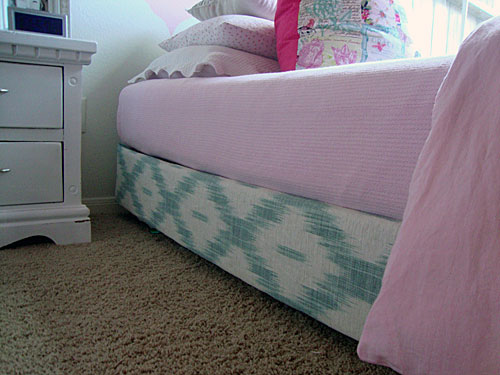
fabric, I decided to lift up the box-spring with wooden legs and wrap the box-spring in Laura Ashley's gorgeous teal ikat print.  I glued the fabric to the box-spring using Fabri-Tac.... a super, simple project and well worth the time.  No more adjusting a bed-skirt every time I make the bed!

Girls Bedroom

Near the top of the bed, I piled three pillows.... a king-sized (the scalloped white), then a tiny floral print (same as the sheets) in a standard size, then a smaller size pillow covered in a black and ivory ticking stripe fabric.  The large euro size pillow in front was made with Micheal Miller's floral print (Belle Rose in Pink) on the front a solid fuchsia color (Hibiscus in Pink) on the back.

Girls Bedroom

The comforter folded at the bottom of the bed is a simple, inexpensive duvet sold by Ikea, the Dvala.  The duvet came in white, but I used the powder form of Rit Dye in Petal Pink to make it pink.  I stuffed the duvet with the girl's old comforter from their previous room in VA, seen here.  In all honesty, I was nervous about dying the fabric, but the process turned out to be quick and painless.  I used one packet of dye for both duvet covers and followed the washing machine method... both covers came out of the dyer completely solid pink, no streaks!  Great results (it was so easy, I think I might be doing this again for another room!).

Girls Bedroom

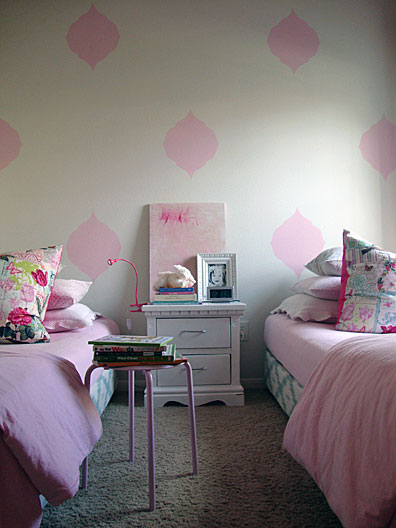
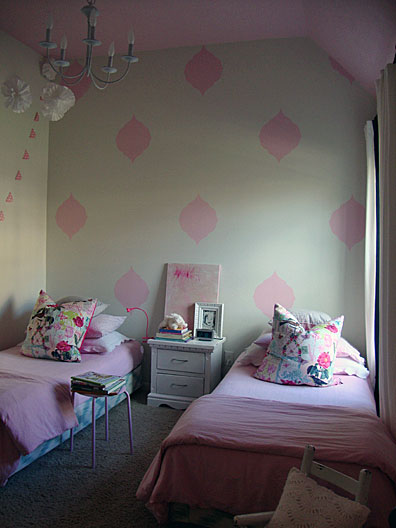
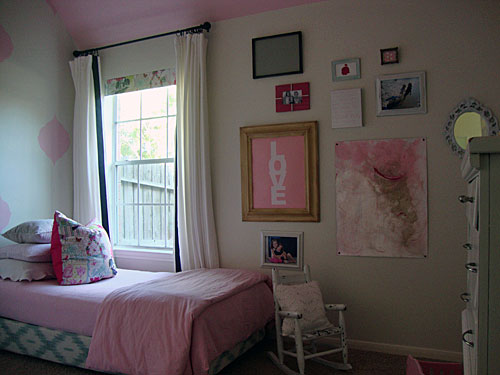
The twin beds do not have a headboard or footboard.... I thought about buying two or making two.  Then I looked at my budget... it wasn't much, so I opted to skip the headboards and use pink paint (Rose Garden by Benjamin Moore) I already had to paint a design on the main wall.  I created a stencil out of heavy cardstock taped together (so it would be bigger than standard 8.5" x 11" paper) , measured where each design should be on the wall, traced the stencil in the marked spots, then finally painted inside the lines.

Girls Bedroom

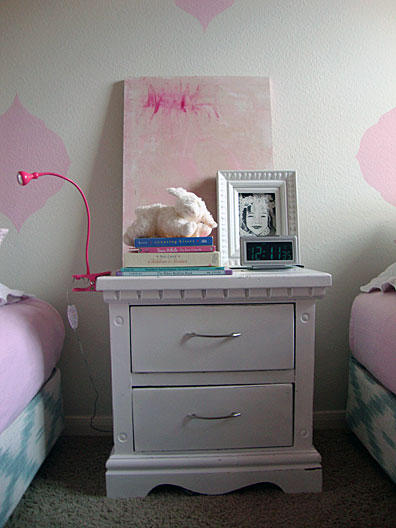
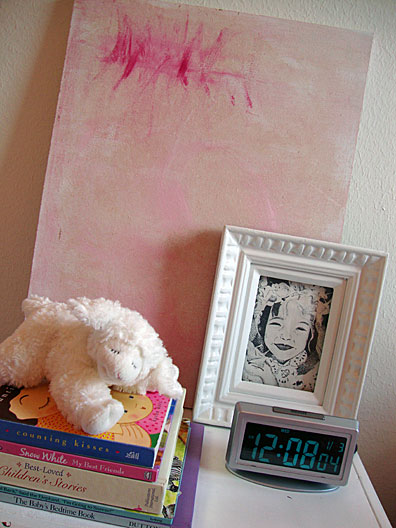
In between the twin beds, I placed a nightstand and topped it with one of my paintings (in pink, of course) and an art piece I had done in pen and ink way back when I was in high school!  It's the image of a young girl wearing a floral hat.... I absolutely love it because I think the girl actually resembles both of my girls... it's a perfect fit!

Girls Bedroom

Girls Bedroom

On one side of the room, there's a window and a partial blank wall.  I added Ikea Lenda curtains (from my dining room in VA- I cut off the tab tops and hung them with clips), then added black grosgrain ribbon on the edges, just like in my living room (tutorial here).  There's a roller shade behind the floral print above the window.... I like to hide the stark white shades, (just like I did in my son's bedroom, tutorial is here).

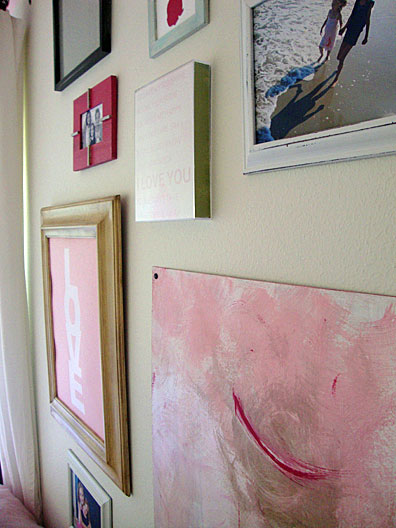
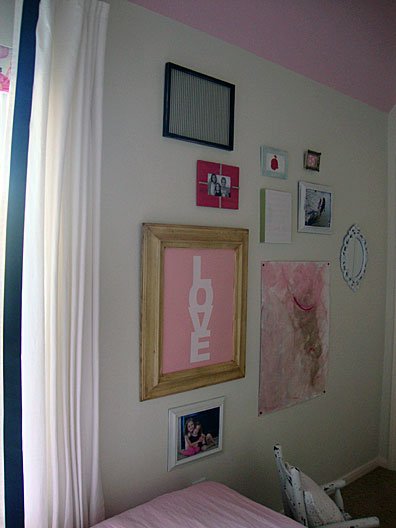
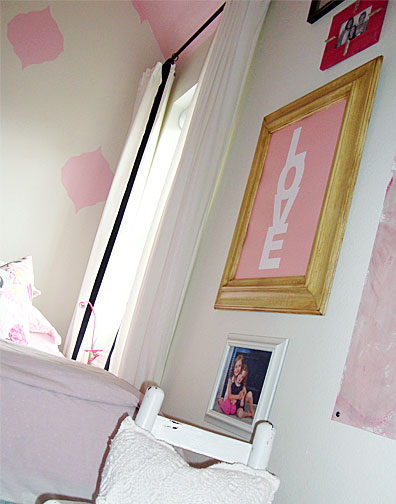
On the blank wall, I added a gallery wall... I love gallery walls, like here and here).  It's a mix of photos, fabric, a silhouette, a mirror, another one of my paintings, and Made By Girl's LOVE print in the bubblegum color.....

Girls Bedroom

Girls Bedroom

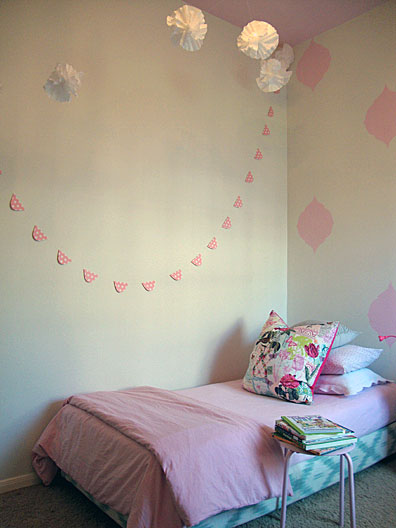
On the opposite wall, I added a mixture of two banners that I strung across the wall/room.  For the pink banner, I cut dome shapes out of polka dot wrapping paper and hot glued them to string.  For the white banner, I scrunched about five white coffee filters and hot glued them together.  After I had several "balls", I hot glued them to string and stung them across the room.

Girls Bedroom

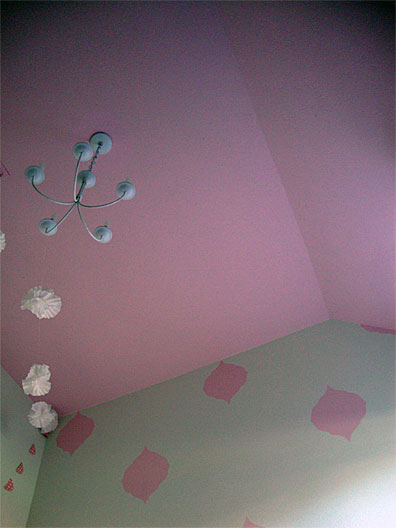
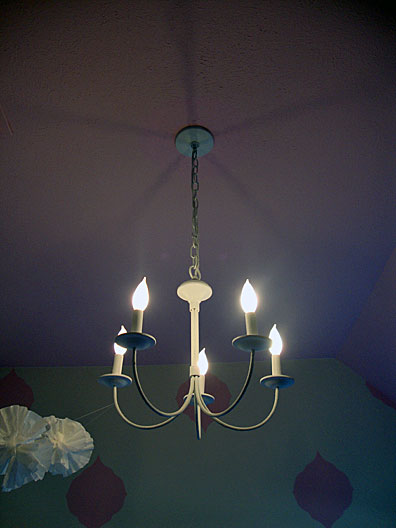
My favorite part of the room is when I look up at the ceiling.  I know this picture may look quite strange, but it's my view when I lay on the floor and look up.  I love seeing all that pink... and of course I love that white chandelier.... can you believe I picked up this chandelier at a thrift store (in Ocean Isle, NC - one of my favorite vacation spots!) for only $5!!!  It was originally the color red, but after a quick coat of spray paint and frosted light bulbs, it looks new again!

Girls Bedroom

It really makes the room sparkle when the lights are on....

Girls Bedroom

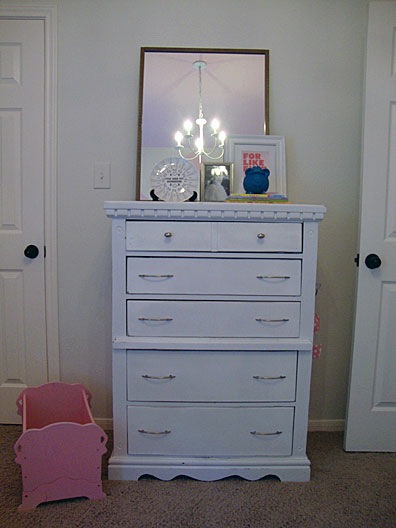
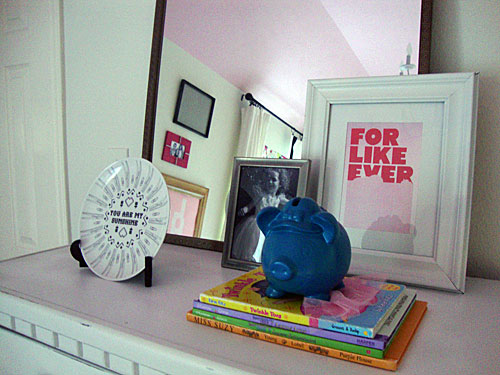
And I love that I can see the chandelier again through the mirror resting on the dresser....

Girls Bedroom

This mirror on the dresser has moved around with us year after year and has remained wrapped and packaged inside the moving box.  It was an unframed mirror with paint stains around the edges, but I wanted a mirror in this room so I decided to unpack the mirror and make it pretty.  I bought Greek key trim, cut it to fit the mirror, spray painted the trim bronze, then glued it to the edges... much better!

Girls Bedroom


Girls Bedroom

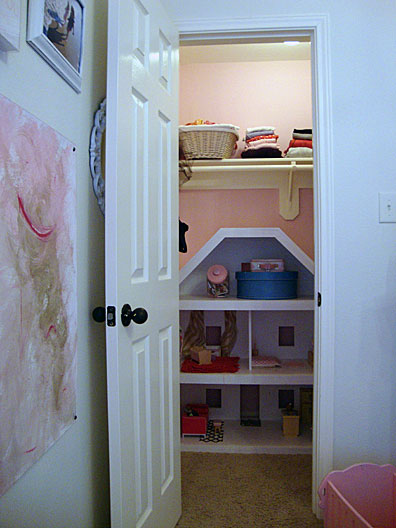
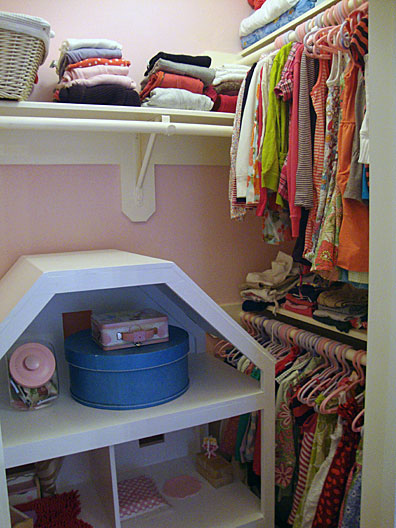
My dad made that beautiful dollhouse for the girls (we're beginning to decorate all those rooms!).  If you're curious, the girl's clothes are hung over on the side...

Girls Bedroom

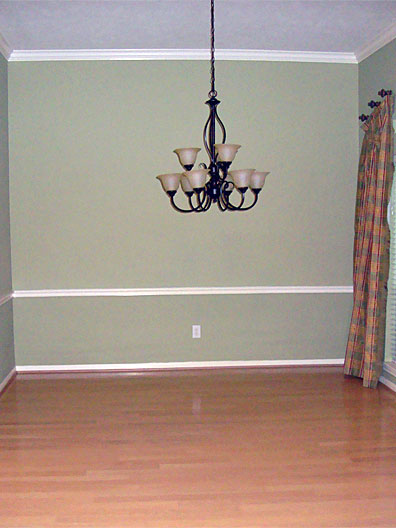
And now for the best part.... my favorite, the before and after!  Here's the girl's bedroom before....

Bedroom Before

And after....

Girls Bedroom

Now that's a lot of pink.... I'm sure the girls are dreaming in pink!

Linking up to Savvy Southern Style, House of Hepworths, Southern Lovely, It's A Hodge Podge Life, Chic On A Shoestring Decorating, Remodelaholic, Fingerprints on the Fridge, Designer Garden, Tatertots and Jello, I Heart Naptime, Between Naps on the Porch, Wiccan Make Some Too, Skip To My Lou, Sumo's Sweet Stuff, Tip Junkie Coastal Charm and Bear Rabbit Bear.

Aug 9, 2011

Pinterest Love

I finally gave in.... I joined Pinterest.   I absolutely love it.   I mean really love it!  It's such a great place to explore all the creativity out there, find new ideas, and most importantly save all these great ideas in one place.  I'm lovin' Pinterest!

Pinterest

If you're unfamiliar with Pinterest, it's a virtual pinboard..... it lets you organize and share all the amazing things you find all over the web.  You can even browse pinboards created by other people!  I've pinned photos from everything to home inspiration and DIY all the way to fashion ideas and kid's craft ideas. 


Of course, my favorite photos to pin are home interior ideas.  I love all that's out there.... here's a glimpse at one of my boards...


So, if you'd like to see what inspires me, become a pinhead and follow along with me on Pinterest!

PS - My girl's bedroom is just about finished.... I'm hoping to post about it within the next week!!!

Aug 1, 2011

Signing off.... for a while...

Well, it's about that time.... I absolutely love blogs, reading and writing, but with our new journey of homeschooling beginning this month, I'm convinced I need to devote more time to this HUGE responsibility I'm about to undertake.  So, that means not as much blogging.

I was reading a post at Fly Through Our Window the other day, and it really solidified the fact that I need to hop off the computer and stay off the computer more often to give my family more of my time.  With school approaching, this is definitely the case.

I'll probably be buried in books, lessons plans and kid's craft projects (and probably a lot of finger paint), but inbetween I'll still be trying to finish decorating our house.  I plan to limit my posts to pictures of the rooms when they're finished, instead of posting each project leading up to the big reveal.  So, if you'd like to stay connected and see each room as it's completed (or if I find time to sneak in an extra post here and there), go ahead and follow along, subscribe to posts or sign up by email to have posts delivered straight to your inbox.

On a side note, I seem to finish decorating rooms a lot faster when I'm not constantly blogging about each step.... so, here's a glimpse at how my girl's room is coming along.... more to come (in a while)....

Girls Bedroom

I hope you enjoy the last bit of summer and beginnings of a new school year!!!

Cheers,
Kristy

PS - If you have any positive homeschooling tips, I'm all ears!!!
Related Posts Plugin for WordPress, Blogger...